Arts | Homeschool | Subject
Apple Tree Art Project Tutorial

I know that many moms are doing apple units for the beginning of the year. Here is a great landscape art project you can incorporate into any apple unit or just do it as a stand-alone project. It would be great for a Friday afternoon after a visit to your local apple farm for apple picking. It’s an easy project that anyone can do with her children, and it’s ideal for teaching perspective and using layers.
What you need for this apple tree project:
- 9×12 inch tag board paper
- pre-cut from construction paper: green hills and an “up close” tree trunk in brown
- glue sticks
- mod podge-for gluing and adding embellishments at the end
- any colored construction paper for 1 or 2 buildings
- stickers and other 3D embellishments for final touches
- tempera paint for your sky color–mix with water so it’s thin like a color wash
- red tempera paint for apples and green for leaves

Vocabulary to be discussed and used for this lesson:
- overlapping
- layering
- perspective
- landscape
- foreground
- background
- parallel
- perpendicular
Use as many of these terms and explain them to your child as you go step by step through the project.
Apple tree landscape tutorial:
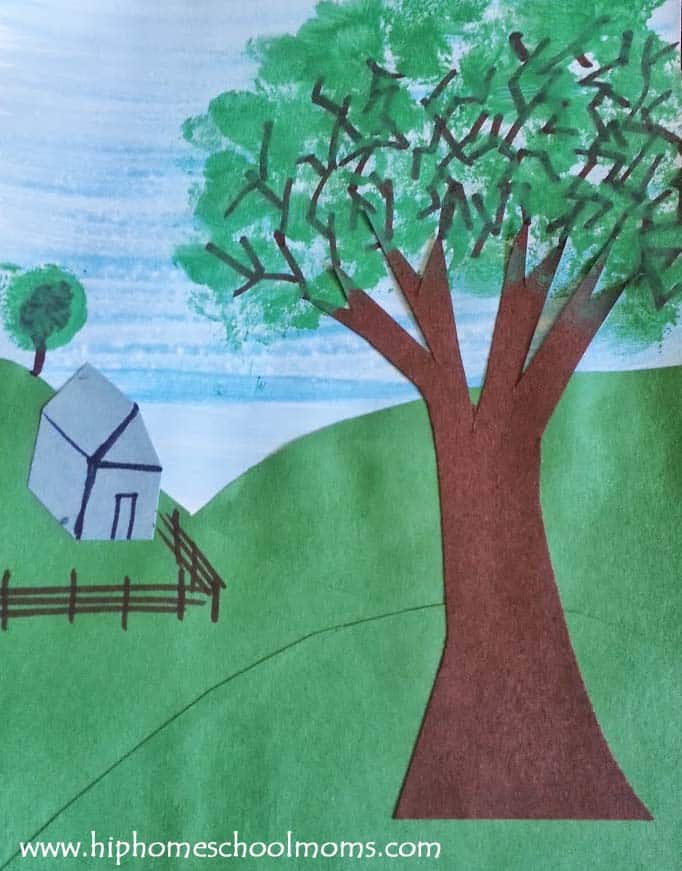
- Paint a light blue sky from the top of the paper down to just past the middle and stop. Use blue tempera paint and mix with white. To make this a color wash, just add water to thin the paint a bit. Brush on lightly. The more water you use, the lighter the color will be.
- Once the top is dry, you will add the hills. Using your pre-cut construction paper hills, have your child add them with a glue stick. This holds them in place until later. The hill in front would be the closest and the hill behind the farthest away. When something is in front of another object, we can’t see it. This is overlapping.

- Next have children glue the tree trunk on the foreground right and add branches with marker. (I would have them practice making branches as part of a warm-up exercise.) Mention that the tree will be the largest thing in the collage; since it is closer, it will even be bigger than the house in the scene. If they want to add more trees in the back, they will need to make them small so they appear far away. This creates perspective.
- Next you can add as many 3d houses as you like. (Making 3-D houses might be another practice exercise.) Place them properly for their size. Remember the smaller they are the farther away they are. If they are behind the tree then they can not be glued on top, so avoid placement near the large tree.
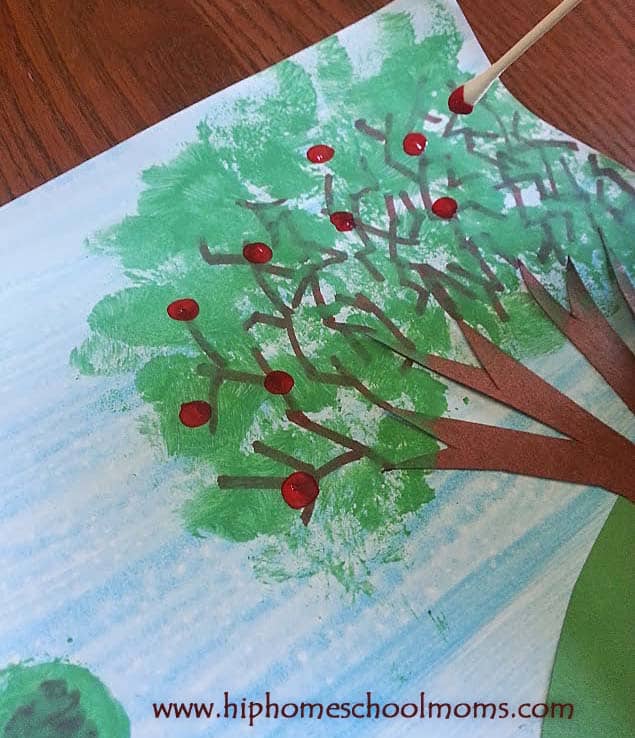
- Now you can add leaves to your trees by using a stencil craft brush and dabbing with green paint for leaves on the trees. Blot and dab only, do not use brush strokes. Once dry enough, you can also use red dots for apples on the trees.

Adding apples to the tree. - Last, add apple stickers, bees, flowers and more to your summer landscape placing them appropriately for their size. If your children want to add things that aren’t stickers, you can add them with mod podge. This will also glue the paper hills and tree down even better.
Ways to use this Apple Tree Landscape in your homeschool:
- If you want to add some math fun to your study of apples, download these super cute Fun on the Farm with Apple Tree Math printables (for younger students) or this Apple Math: Multiply by 6 printable pack.
- Or do this All About Apples Unit Study and include this tutorial as your arts and crafts element! Or, here’s another Apple Unit Study from Starts at Eight!
- Go apple picking and create this scene for a follow-up project. Then make an apple recipe or two! You might want to make a Decadent Caramel Apple Cake for Autumn or these Gorgeous Apple Tree Cupcakes.
- Do a lesson on life cycles using this Apple Life Cycle printable. Then read How Do Apples Grow?
 by Betsy Maestro. Make the landscape and discuss what part of the cycle this tree is in.
 - Use with a lesson on Johnny Appleseed.


This looks awesome! Thanks for posting! Can’t wait to try it out :)4